Sunday, February 12, 2012

Make It Sunday @ Elle's Studio

Elle's Studio has invited past design team members to create something and share it on their blog in their Make It Sunday feature.

Here's a peek at my project.


Today is my day and I hope you'll stop by and see what I made!

Thursday, February 9, 2012

The Perfect Chocolate Chip Cookie

There is something just so decadent about a perfectly browned, hot, moist and fresh from the oven chocolate chip cookie. I've made a lot of chocolate chip cookies and I think I've found the perfect recipe. 

This recipes includes the usual list of ingredients, but it is the way they are combined that makes this recipe unique. It takes a little more time to allow the dough to rest in between mixing, but I think it's worth the wait.


(This recipe was adapted by me from the May & June 2009 issue of Cooks Illustrated Magazine)

Ingredients
3 1/2 cups all-purpose flour
1 teaspoon baking soda
3 1/2 sticks salted butter
1 cup granulated sugar
1 1/2 cup dark brown sugar
1/2 teaspoon salt
3 teaspoons vanilla extract
3 large eggs
1 1/4 cups semi sweet chocolate chips
1 1/4 cups dark chocolate chips (I like Ghiradelli 60% cocoa)

Preheat over to 375 degrees.

1. Heat 3 sticks of butter in a saucepan and stir until the butter starts to turn brown and have the great browned butter smell.
2.  Once butter is browned, pour it over the remaining 1/2 stick of butter in a mixing bowl and allow the butter to melt.
3. Add both sugars, salt and vanilla to the butter and mix. Add the eggs and mix for 30 seconds.
4. Let the batter sit for 3 minutes and then mix again for 30 seconds. Repeat this two times.
5. Mix in flour and baking soda.
6. Add chocolate chips and mix until combined.
7. Use a cookie scoop (mine is 3 tablespoons) to portion out dough onto baking pan.
8. Bake for 10 - 12 minutes. Wait until the cookies are slightly golden before pulling them from the oven. Allow the cookies to rest on the cookie sheet for three minutes after taking them out of the oven and then move them to a cooling rack.
9. Let cool slightly before eating and enjoy!

Notes:

*** Once all of the ingredients are mixed the dough will be very soft and shiny. Don't be tempted to add more flour!

*** This recipe will make around 5 dozen cookies. I usually bake a couple dozen cookies and then freeze the rest of the dough in cookie balls in freezer bags so that we have cookie dough ready whenever a craving hits.

*** I use my Kitchenaid mixer with the paddle attachment to mix the batter. Your could also use a hand mixer to combine the ingredients before adding the flour. Once you add the flour, you could mix by hand.

Let me know if you give these a try!

Tuesday, February 7, 2012

Project Life 2012: Week Five

The first month of Project Life 2012 has been successfully completed. This project is perfect for me right now. It's a great place to collect the little stories about our family that would otherwise go untold.


Each week it is a challenge to narrow now the photos for the pages because these are so many I want to share.  I'm trying to keep a balance of photos, journaling and space for a few creative elements.


This week I used paper from the new Basic Grey PB & J line at the filler for the non-photo pockets. I was lucky enough to get a sample pack of all of the new Basic Grey papers at CHA, so I'm sure more of it will be making an appearance in my projects.


This page features two of this week's highlights which was my CHA trip and our family going to a Suns game.

One of the CHA photos is a screenshot of texts with my husband while I was away plus there is a photo of our design team at CHA and a photo of kit designing back at the hotel. 

We mainly went to the Suns to hear Audrey sing the national anthem with the Chandler Children's Choir. Luckily the Suns pulled out a win. They have been a bit of a disappointment lately.


Of course, the pages would not be complete without food photos. We took the kids to Kokomo for yogurt one night. Although the photo of the three of them wasn't the best, it was all I had, so it went in the book.  Ward and I tried out a new restaurant with my sister and brother call Italian Restaurant and it was pretty good, although I thought it was overpriced for the amount of food. Not sure that we'll be going back.


My Silhouette was put to work on the bottom half of this page. I cut the "today" tag, the & sign and the honeycomb pattern with the Silhouette.

Have I mentioned that my Silhouette is getting ungraded to a Cameo?!? While at CHA, the Silhouette booth had a drawing for a new Cameo and they drew my card. There was only one winner, so I was feeling very lucky. Now I'm just impatiently waiting for it to arrive.

Thanks for stopping by today. Hope you have a fantastic day.

Saturday, February 4, 2012

Project Life 2012: Week Four

Four weeks into Project Life and I'm still enjoying it. Only 48 weeks to go!


This week I had my Remember This kit out on my desk, so I reached for those items to embellish this page. The aqua and yellow combo is one of my favorites right now.

One of my favorite things in the kit is the chevron print bags. Here I used the yellow chevron bag in one of the pockets and it fit perfectly. 


We made chocolate chip cookies using our favorite recipe this week and I decided to include the recipe too. The secret to the recipe is browning the butter. It's seriously so good.


This was a busy week with a science fair, trip to CA for me which included a night at Disneyland and the Pinewood Derby. I'm happy I have a place to document all of these stories for our family.

Friday, February 3, 2012

Phone Photos

My photo taking habits have changed so much since I've been able to take photos on my phone. Since I almost always have my phone by my side, I'm much more likely to take a quick photo right while we are doing something.

A couple of nights ago Hannah and I were reading on the couch and she looked so cute reading to me, so I snapped a couple of pictures. Thanks to my phone for being nearby, these photos were taken. One of these photos was filtered in Instagram. On the other photo, I used the Pioneer Woman action "seventies" in Photoshop so that the two photos could have a similar feel.


The read tag was made with kraft paper cut in the Silhouette. I loaded a tag shape into the Silhouette program and then added the text to the tag.

The journaling is on the yellow tag that it tucked inside the notebook style bag. The tag started out white and I colored it with Tattered Angels Sunshine Mist.


The printable in that goes with the Remember This kit has a bunch of photo frames. It's a fun way to add a may to a photo.


One last thing to share tonight. I put a card together this week to give to Diana when we went out for her birthday lunch.


Layout and card supplies are from the Remember This and Be Amazing Kits. 

 Hope that you have a fantastic weekend!

Wednesday, February 1, 2012

February Photo Challenges

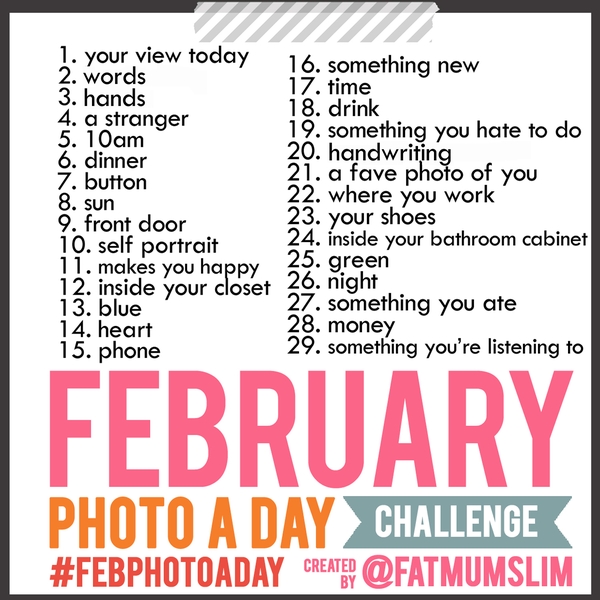
This month I thought it would be fun to play along with a couple of photo challenges. It's a short month, so maybe I'll be able to keep up!

The first challenge is a daily photo from Fat Mum Slim's blog.


My view today:


I spent several hours working in my scrapbook room today. Lot's of Scrapbook Circle work going on. Processing incoming orders, placing orders and customer service. It was a good day. I also finished up my Project Life pages from last week, so I'll be sharing that soon. Yes, I need to clean up my desk.

The second photo challenge I decided to join in is 29 Things I Love in February on Allison Waken's blog.  Allison and I met at Creative Estates last year and she is a talent scrapbook and photographer her in AZ.  I'm excited to play along with her challenge.

All you have to do for this challenge is snap a picture of something you love each day.


Today I loved having Hannah read her bedtime story to me. So sweet.

It's hard to make it through the Love You Forever book without tearing up, so it was good that Hannah was reading instead of me. She was so cute. Everytime it came to the "Love you forever, Like you for Always" part she would set the book down and say the lines while pretending to rock a baby.

I'll be posting all of my photos on Instagram.

Did you know that even if you don't have an Instagram account, you can see the photos here? As long as the user's account is public, you can look up friends and see their photos.

Are you playing along with any photo challenges this month?

Playing with Pink

Pink isn't usually one of the first colors that catch my attention when I'm creating, but this month the pinks in the Glitz Beautiful Dreamer line seemed irresistible.

This month the Glitz blog challenge is to use this color palette on a layout.


The pinks in the challenge plus the topic of a baby girl baby shower had me using as much pink as I could fit on this page.


This page started out as a regular 12 x 12 page, but it just wasn't feeling right. I decided to do something that I haven't done in years: make a 2 page 8.5 X 11 layout. This size was just right for fitting my pictures and leaving space to tell the story.


This page was so much fun to create. I layered long banner strips with tulle and then the photo. I sewed it altogether with hot pink thread. The little flags added a playful touch to the page and were a perfect spot to place the title. I wrapped the flags around pearl topped stick pins to add another bit of a feminine touch.


Another thing I haven't done in a very long time is type out my journaling. My handwriting just wasn't working on the page, so I trimmed down one of the Glitz papers, fed it through the printer and then cut the journaling into strips.

The inspiration for my second layout was the sweet "You are My Sunshine" card in the Glitz Whatnots. I love that song and wanted to use it one a page. The grid design with photos of my three kids plus the song card came to mind mind and I went with it.


For the title on this page, I cut this paper layer apart and pieced it back together to spell "I Love You."


Now that I have my sewing machine set up and running, I'm finding it hard not to add a touch of sewing to each of my pages and this one was no exception. I hand tore the hearts and then sewed them right onto the page.


Thanks for stopping by! I hope you enjoyed my PINK layouts today.

Lisa

Nancy's Baby Shower Layout Supplies
Glitz Designs "Beautiful Dreamer" Patterned Paper: Damask, Floral, Polka, Houndstooth, Stripe
Glitz Designs "Beautiful Dreamer" Trims
Glitz Designs "Beautiful Dreamer" Peek a Boo Transparency
Glitz Designs Teeny Alpha White Type
Other: Date Stamp, Distress Ink,  Mini Staples, Stick Pins


I Love You Layout Supplies
Glitz Designs "Beautiful Dreamer" Patterned Paper: Damask, Floral, Polka, Houndstooth, Stripe, Toile
Glitz Designs "Beautiful Dreamer" Paper Layers
Glitz Designs "Beautiful Dreamer" Whatnots
Glitz Designs "Beautiful Dreamer" Giant Rhinestone
Other: Date Stamp, Distress Ink

LinkWithin

Related Posts with Thumbnails

ShareThis